Windows Mobile/CE New Item
Inventory Items can be created on the mobile device (all other item types must be created on the PC).
- Tap on the Inventory > New Item.
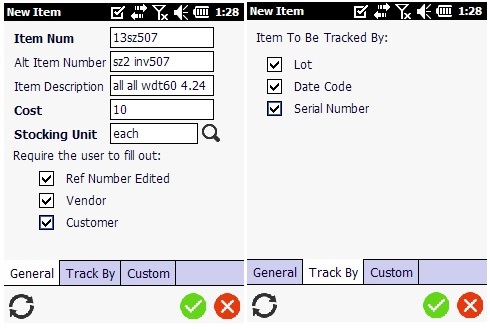
- The New Item screen appears.
General Tab
Note: You can use the keyboard to enter the information in any field. Or If you want to scan a barcode, use the Barcode scanner. Tap on the Barcode symbol, the scanner will appear. Scan the barcode and the field will display the scanned barcode number.
- Enter the Item Number.
- Enter the Alternate Item Number.
- Enter the Item Description.
- Enter the Cost.
- Select the Stocking Unit. Tap on the arrow button, a list will appear. Choose the stocking unit from the list.
Items to be Tracked By:
- Tap on the checkbox to select the method with which you want to track your Items. The options are Serial Number, Lot, Date Code, Ref Number, Vendor, Customer.
- Serial Number On Invoicing Only will be enabled once you select the Serial Number.
- Auto Generate Serial Number will appear on selecting Serial Number. Tap on it, if you want to automatically generate the serial number.
Custom Tab
- Tap on the Custom tab, fill all the fields especially the mandatory fields.
- Tap on the Save button.
- A message will appear indicating that Item saved successfully.