Customer Lookup
The Customers Lookup lists all customers you have created in InventoryCloud. From this page, you can view, add or delete customers.
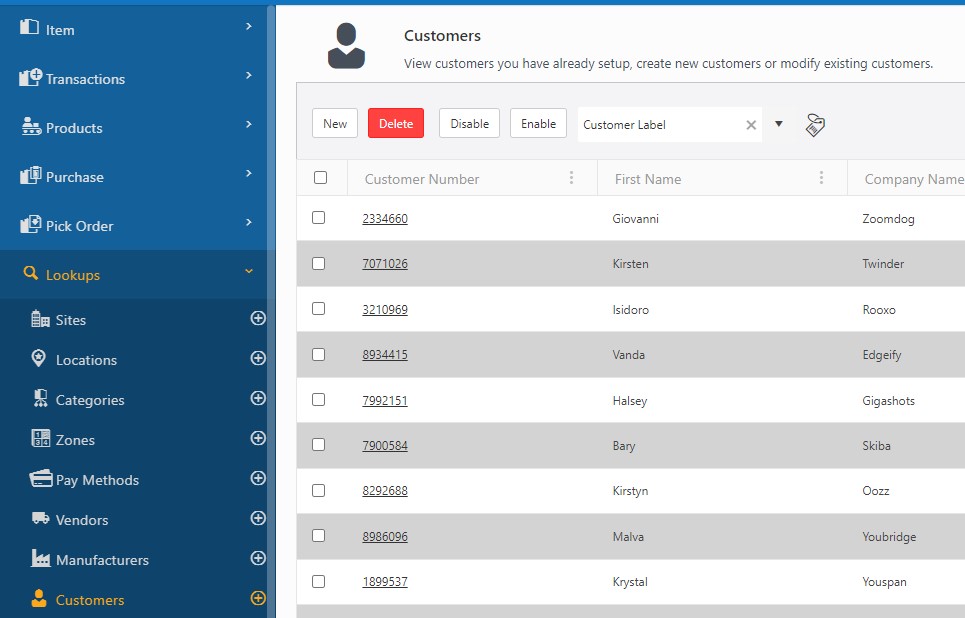
View Customer Lookup
Click on Lookups -> Customers.

The Customer screen will appear.

By default, the lookup page displays 20 items per page. Scroll through the pages using the navigation buttons at the bottom of the screen. Change the number of items listed on each page using the dropdown menu.
Note: You can change the numbers in the dropdown on the Options page.
The Customer screen has the following functionalities:
- New - Click on the new button to add a customer. Refer to the topic Add a Customer or New Customer.
- Edit Link - The customer name link allows you to edit the information. Refer to the topic View/Edit Customer.
- Delete - The delete button allows you to delete customers. Refer to the topic Delete a Customer.
- Show Filter: When you click on the Show filter checkbox, a text box will appear below each column header. In these text boxes, you can input your search criteria to locate the specific information you're seeking.
- Status - Status will display which customer is Active and Inactive. You can view the customers who are active/inactive by clicking on the status.

- Export (
 )- This feature enables you to export the listed customer to an Excel spreadsheet. It can export up to 25000 records. Customize the list according to your requirements using the filters option. Once you've filtered the list to your satisfaction, click on the Export icon. This will initiate the download of the report. In most web browsers, you can access the downloaded file through an icon at the bottom or edge of the browser window. For further guidance on locating your downloaded files, please refer to your browser's help resources. You can then save or modify the report as necessary within Excel.
 - Group By - The Group By feature allows you to "group" the displayed information in the View Customers screen. Depending on how you want to view your information, you can have one group, two groups, or many groups. To use this feature, click on the Group By checkbox. A grey-colored blank area will appear where you can drag and drop the columns. Based on the selected column, the information will be grouped and displayed.

- Enable: This option allows you to enable a customer. Select a customer by clicking on the checkbox. Click on the Enable button. A message -" You are about to enable 1 customer. Are you sure?" will appear. Click on the Enable button again. The status of the customer will be active/enabled/true (displayed in green color).

- Disable - This option allows you to disable a customer. Select the customer by clicking on the checkbox. Click on the Disable button. A message -" You are about to disable 1 customer. Are you sure?" will appear. Click on the Disable button again. The status of the customer will be Inactive/ disabled/ false (displayed in Gray color).

Adding a Customer
To add a new customer:
- Click on Lookups -> Customers -> New button Or click on Lookups -> Customers ->
 button.
- The New Customer screen will appear.

Customer Details
- Enter the customer's number (mandatory).
- Enter the customer's name.
- Enter the company's name.
- Enter the department's name.
- Business Details - Click on the
 icon to add the details. Enter the business phone number, business email, business fax and/or website details.
 - Contact - Click on the icon to add the details. Enter the contact phone, contact extension, contact cell, contact fax and/or contact email.
- Addresses - Click on the add address button to add an address.
- Select the type of address you are adding using the address type dropdown menu. You can create a new address type by clicking in the address type field and entering a new name. You can edit an existing address type by selecting an address type from the dropdown menu, clicking in the address type field, and typing in a new name.
- Enter the complete address and Click on the Update button.
- To add additional addresses, click the Add Address button again (you may have to scroll down to see the Add Address button).
- To edit, click on the button to edit the address details.
- To delete an address, click on the Delete button.
- Attachment tab - Click on the attachment tab.
- Click on the Attach Files button.
- Click on the Select Files button.
- Drag and Drop - You can drag a file from a folder in Windows Explorer and drop it into the attach files window. Make sure the select files area is highlighted before dropping.

- Click on the Edit button to edit the details. To delete an attachment, click on the Delete button.

- Click on the Save button. A message will appear indicating that a new customer is added.
- If you want to add more customers, you can check Save and add another checkbox before saving.

View/Edit a Customer details
- Click on Lookups -> Customers. The Customers screen will appear.
- Click on the customer number. It is a link.

- The screen will navigate to the View/Edit Customers screen.
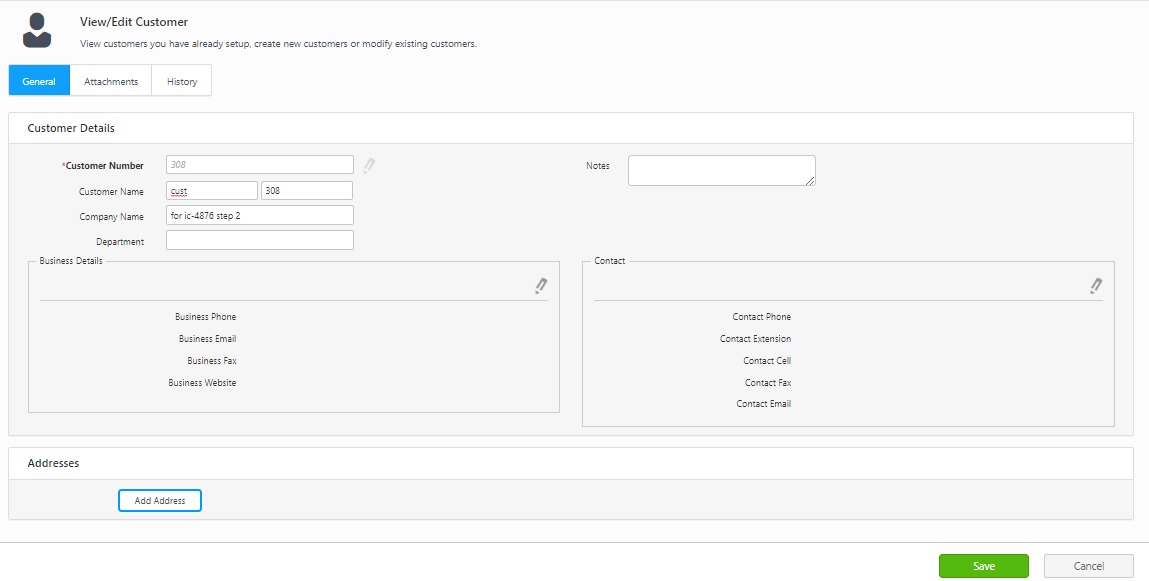
- You can edit the details.
- General Tab, Attachments, Custom Fields - Refer Adding a new customer.
- History Tab - Click on the history tab to review the transaction type, time, pick number, action and username (who performed the transaction).

- Click on the Save button.
- A message will appear, indicating that the customer is updated successfully.
Delete a Customer
- Click on the Lookups -> Customers.
- Select the Customer and click on the Delete button.
- A pop-up message will appear asking for confirmation.
- Click on the Delete button again.
- A message will appear indicating that "1 customer is deleted successfully".