iOS Adjust
The Adjust Inventory screen allows you to modify the quantity (inventory amount) of existing items.
Note: An item tracked by Serial Number which has been Checked-Out cannot be Adjusted.
Tap on Transactions > Adjust.
![]()
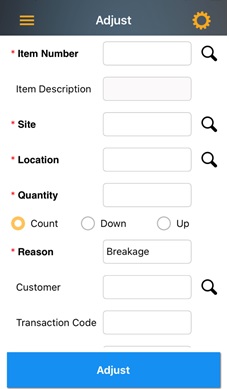
The Adjust screen will appear.
Note:
- Fields that are followed by an asterisk (*) are mandatory. Also, you can lock the field, refer iOS Pinning Data.
- The Magnifying Glass icon next to a particular field will navigates to the Search screen of that particular field. For more details, refer iOS Search topic.
- You can use the keyboard to enter the information in any field. Or If you want to scan a barcode, use the Barcode scanner. Tap on the Barcode symbol, the scanner will appear. Scan the barcode and the field will display the scanned barcode number.

Site-Item/Category Restrictions
If the “Site-Item/Category filter” is applied on the web, during the Adjust Count, the Site-Item/Category Restrictions are applicable if the quantity entered exceeds the current quantity in the system. The error message will appear, indicating that all inventory items cannot be adjusted. The item that cannot be adjusted will have a warning message indicating that "Site does not exist or you do not have security access to this site.” The Adjust Down (removal): No Site-Item/Category Restrictions are applied and in the Adjust Up (add), Site-Item/Category Restrictions are applied. Note: Adjust transaction allows the user to remove quantity for an item that is at a restricted site.
Adjusting an Inventory:
- Enter/scan the item number.
- The item description will automatically populate on selecting the Item number. The field will be read-only. In some cases site, location will also
- Enter the site.
- Enter/scan the location.
- Enter the quantity you want to adjust, then select:
- Count: This changes the count for the item. For example, if you want to change the count for an item from 25 to 36, enter 36 and make sure Count is selected.
- Down: This adjusts the inventory quantity for the item down by the number entered. For example, if the current quantity is 25 and you enter 5 Adjust Down in the Quantity field, the InventoryCloud will change the quantity for the item to 20.
- Up: This adjusts the inventory quantity for the item up by the number entered.For example, if the current quantity is 25 and you enter 5 Adjust Up in the Quantity field, the InventoryCloud will change the quantity for the item to 30.
- Enter a reason for the adjustment. Options are: Found, Return, Breakage, Lost, Cycle Count. Count will display all the options, Up will display Found, Return and Cycle count and Down will display Breakage, Lost and Cycle count.
![]()
- Enter notes, if any.
- Tap on Adjust button.