iOS Move
The Move Inventory screen allows you to move inventory quantity for an item from one Location to another. When you create an item, you can add which locations it may be. When you then add inventory (quantity) to the item, you select in which location that quantity will reside. The Move function allows you to move that inventory from the originally assigned location to another. By moving inventory in the software, you can easily keep accurate records of where all of your inventory is currently located.
You can only move inventory that is listed in the system as having a quantity greater than 0 (quantity is added on the Add Inventory screen or when Receiving inventory.)
Tap on the Transactions > Move.
![]()
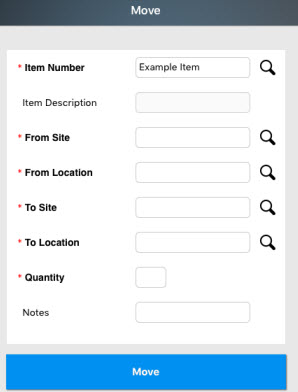
The Move screen will appear.
Note:
- Fields that are followed by an asterisk (*) are mandatory. Also, you can lock the field, refer iOS Pinning Data.
- The Magnifying Glass icon next to a particular field will navigates to the Search screen of that particular field. For more details, refer iOS Search topic.
- You can use the keyboard to enter the information in any field. Or If you want to scan a barcode, use the Barcode scanner. Tap on the Barcode symbol, the scanner will appear. Scan the barcode and the field will display the scanned barcode number.

Site-Item/Category Restrictions
If “Site-Item/Category filter” is applied on the web, then in mobile when looking up an item - if there are working sites set, then the items field will only show the items that have no category or categories within the selected sites. Similarly, if a location is already selected, then the items that have no category or categories within the site for the selected location will be shown.
When lookup up a location: if there is an item selected that has a category then only show sites that have access to all categories or have access to the category of the selected item if the selected item has no category or no item selected then the same behavior as before.
An alert “Item Category is not allowed at Site” will show on typing restricted site name on the Site field.
Moving an Inventory
- Enter/scan the Item Number.
- The Item Description will automatically populate. it is a read only field.
- Enter the From Site and From Location. The From Site and From Location are the Site/Location where the inventory is currently located.
- Enter the To Site and To Location (required). This is the Site/Location to which you are moving the inventory.
- Enter the Quantity of inventory you want to move.
- Enter Notes for this transaction.
- Tap on the Move button.
- A message will appear indicating the Inventory is moved successfully.