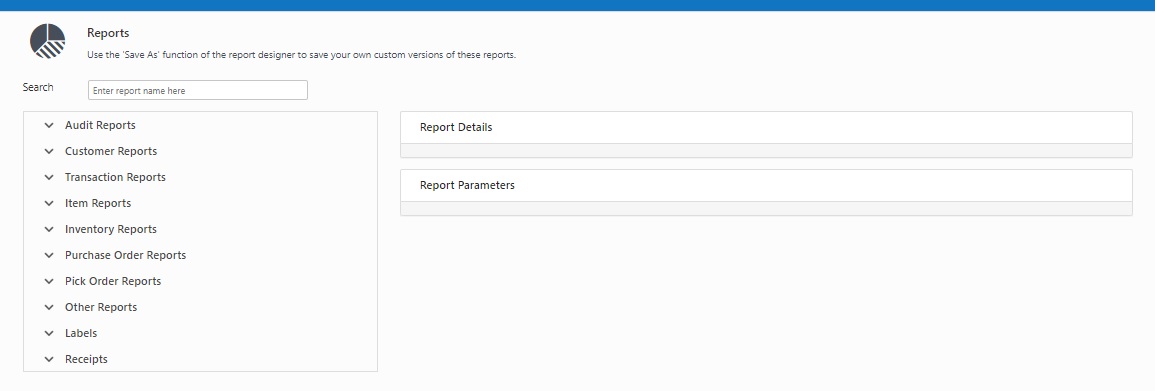
Reports
InventoryCloud comes with a variety of useful reports. The Report screen allows you to generate different reports. You can generate report covering a particular Item detail or all Item details. Each reports are divided into groups. The following reports can be generated in the Reports screen: Audit Reports, Check Out Reports, Customer Reports, Transaction Reports, Item Reports, Inventory Reports, Purchase Order Reports, Pick Order Reports, Other Reports > Mobile Install, Labels, and Receipts.
Note on Limits that apply to reports:
- Web Reports are limited to 10K records.
- Scheduled Reports are limited to 64K records with normal formatting.
- Scheduled CSV Reports are limited to 250K records.
Run Reports
- Select Reports > All Reports.

- The report screen will appear.
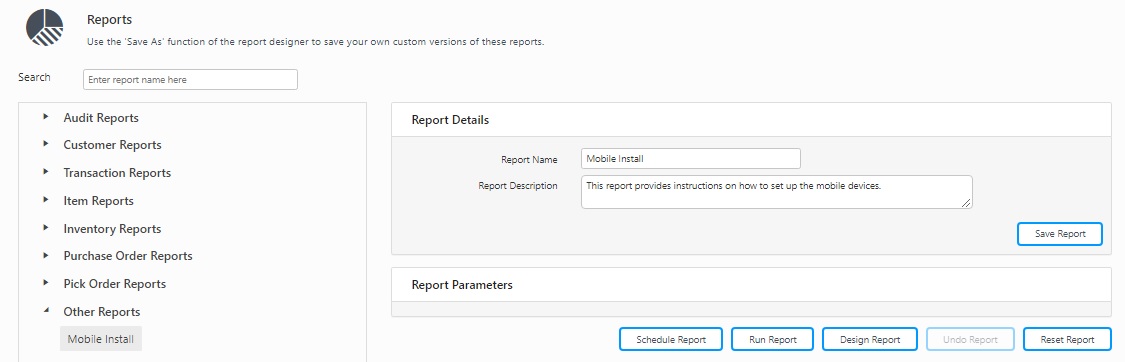
- Select the report to be generated by clicking on the drop-down button. For example, if you want to run the Item by Vendor report, click Item Reports > Item by Vendor Report. The Report Details and Report Parameters will appear.
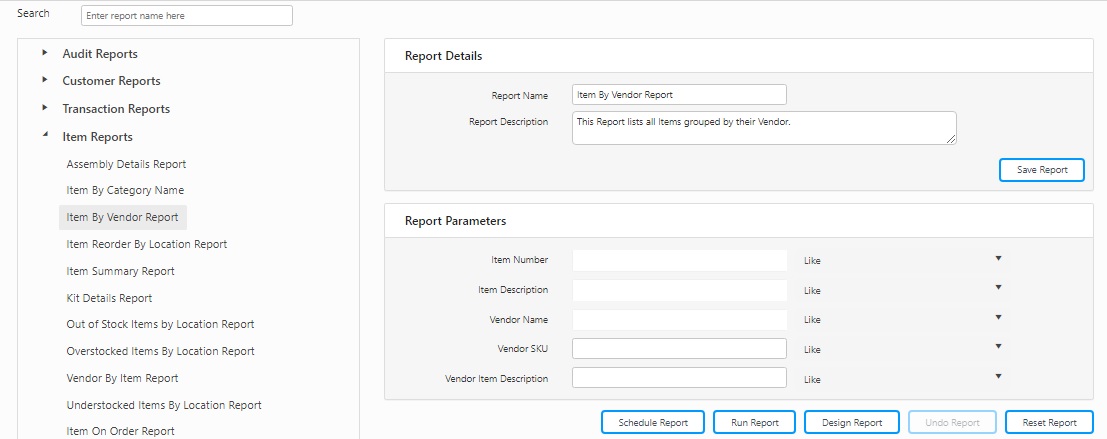
- Report Details: The report details will display the selected report's name and its description. You can edit the report name and the description. After editing, click on the Save button. The Save button in the Report details is ONLY for saving Report Name change and Report Description Change.
Example - Refer below image where the report name is updated - "Audit History By Date Report" is changed to "Audit History By Date Report 2019". After saving, the new report name will appear in the reports menu as well as in the report generated by the user. Similarly new description will appear, if you make changes in the report description and save it by clicking on Save button.

- Report Parameters: The report parameters work as filters to limit the data that appears on the report. Complete the parameters section as needed.
- Select a value in the desired parameter field.
- Select a delimiter for the value. The options are Like, Equals and Not Equals. Example: Continuing the Item by Vendor example, if you want to limit the report to a specific Vendor Name, enter that name in the Vendor Name field, then select Equals from the delimiter field.

- Set as many parameters as needed for the report.
- Click on the Run Report button after setting the parameters.
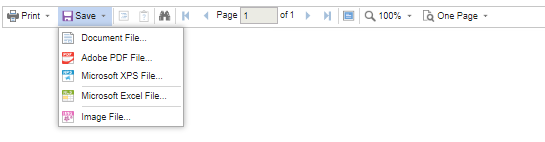
- The report will appear in a separate window. You can use the navigation tools at the top of the report to print, save or browse through the report.

- To print the report, click on the Print button. There are three options - Print to PDF, Print with Preview and Print without Preview.

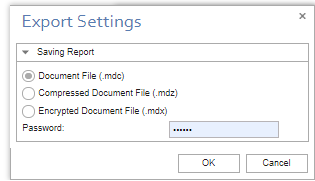
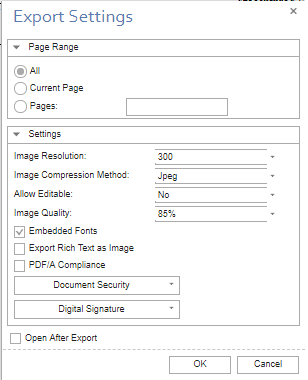
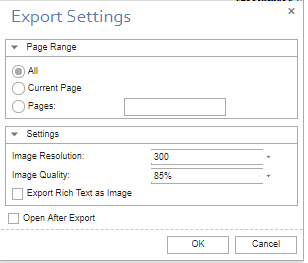
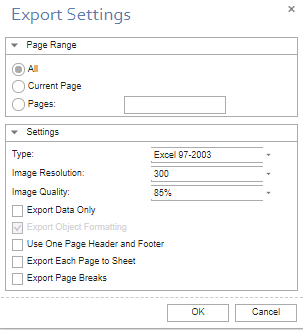
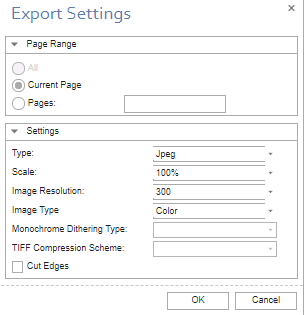
- To save the report, click on the Save button. There are five options - Document File, Adobe PDF File, Microsoft XPS File, Microsoft Excel File and Image File. When you click on one of the options, Export settings screen will appear. You can set the settings in the Export Settings screen.
The Recommended setting values are - Image Resolution = 300dpi (or greater) and Image Quality = 75% (or greater).
- Document File
- Adobe PDF File
- Microsoft XPS File
- Microsoft Excel File
- Image File
Schedule Reports
The purpose of the Schedule Report is to automatically run a report on a specified schedule (i.e a day and/or time) and sends the report to designated recipients through an e-mail. Schedule Report is a button provided on the All Reports screen. The list of the already scheduled report can be seen in the Scheduled Report screen. Refer View Scheduled Reports.
To run a report automatically and to send those report, follow the steps shown below:
- Select the report on the Reports screen.
- Set the desired report parameters.
- Click on the Schedule Report button.

- The Schedule Report screen will appear.
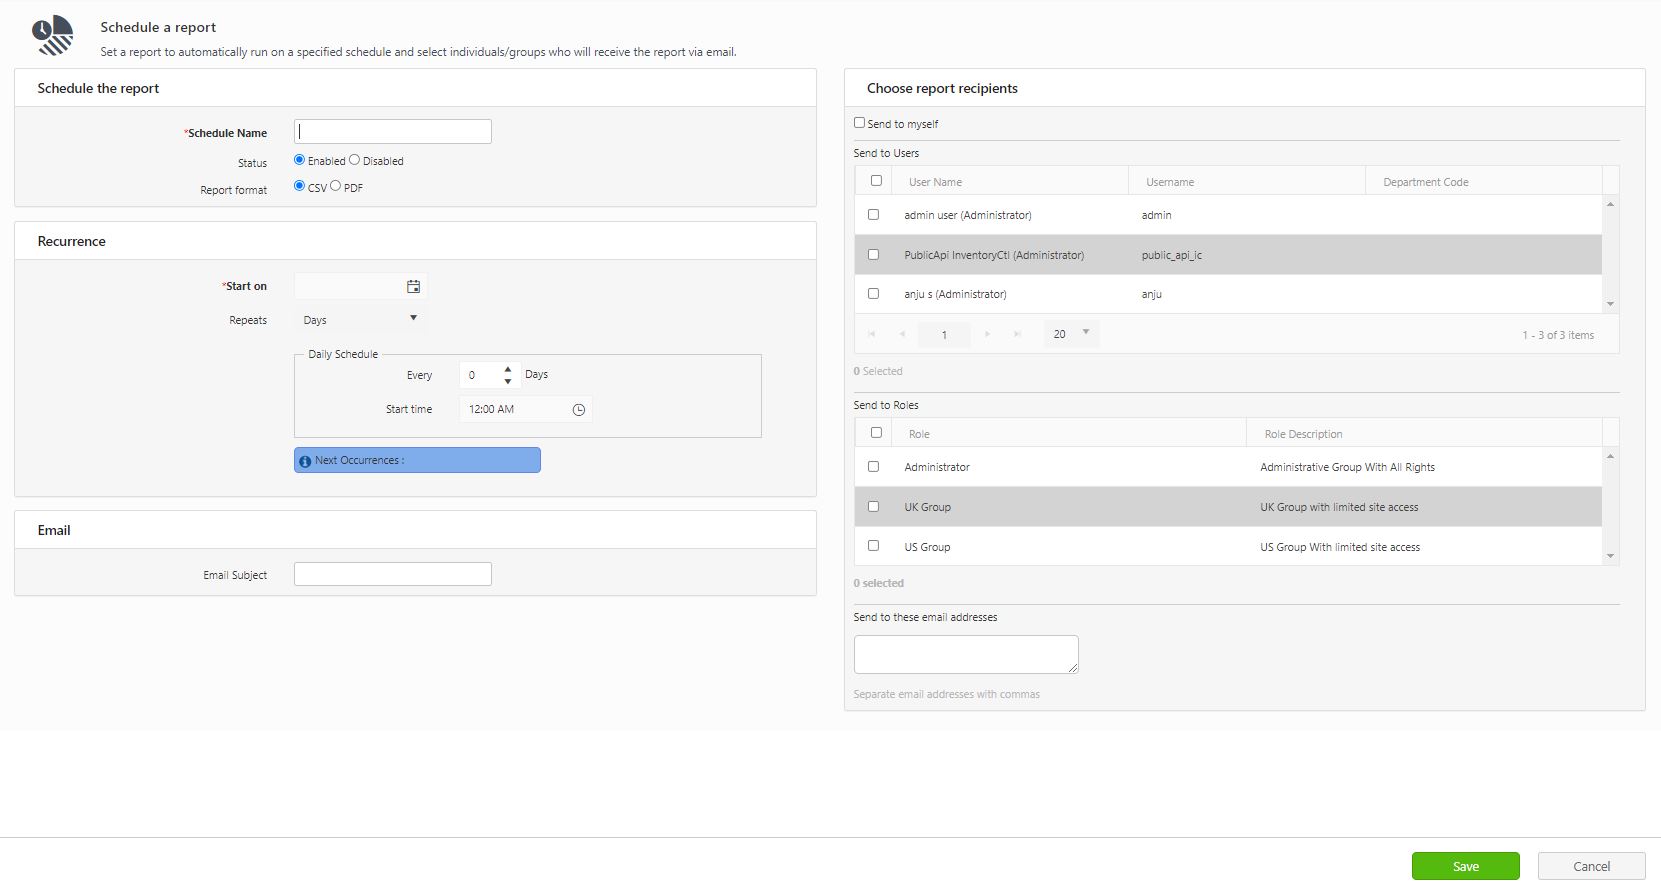
Schedule a Report
- Enter the Schedule Name (mandatory).
- Select the Status. The options are Enabled and Disabled.
- Select the Report Format. The options are CSV and PDF.
Recurrence (mandatory)
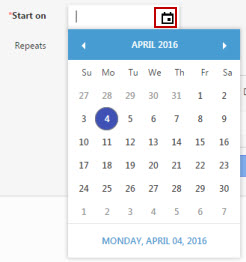
- Select the Start On date to run the report using the calendar.
- Select the schedule at which you want to run the report. The options are Days, Weeks, and Months. Based on the selection the Schedule option will vary as shown below:
Days

Weeks

Months
- Email Subject - Enter the email subject. Now the email subject can be customized in the scheduled reports. You can add placeholders to include the Product, Type, Tenant, and UtcNow. The placeholder will be automatically replaced by the exact information in the report at the time your email is sent.
- EmailSubjectTemplate
- The product indicates the name of the product the scheduled report came from.
- The type will display the app name and Report or Notification (i.e. InventoryCloud Report).
- The tenant indicates the name of the tenant.
- UtcNow indicates the UTC date/time the report was emailed.
- Example: ${Product} ${Type} ${UtcNow} will display will display InventoryCloud InventoryCloud Report 2021-09-12T14:50:05.6667569Z
Note - App.config key name: EmailSubjectTemplate. There is an app config value that is used to replace the email subject line. The app.config value is a default email subject and it is specific to On-Premise. If no subject is specified then this value will be used.
Choose Report Recipient
- Choose the report recipients by selecting the checkbox. The options are Send to Myself, Send to Users, Send to Roles and Send to these e-mail addresses.
- Click on the Save button.
- The Report will run based on the schedule set by you. The receiver will receive an e-mail along with the report.
Design Report
InventoryCloud gives you the ability to customize the reports as needed. This process requires a working knowledge of Stimulsoft Reports. For instructions on utilizing Stimlsoft to customize a report, please refer to https://www.stimulsoft.com/en/documentation/online/user-manual/index.html?exports_how_to_create_report_for_export.htm.
To design a report, select the report on the Reports page, then click the Design Report button.
The Report Designer appears:

For instructions on utilizing Stimlsoft to customize a report, please refer to https://www.stimulsoft.com/en/documentation/online/user-manual/index.html?exports_how_to_create_report_for_export.htm.
Note - The image used should be close to the right size needed in the report. For best results,try not to include small text in the image. Small text in an image will not be as clear as using a text label in the report designer.
Undo Reports
The Undo Reports button can be used to recover from report changes that did not work as expected. Every time you make a change in a report and save it. The InventoryCloud will create a backup copy of the older version of that report before saving the new report. If you see unexpected or undesired results after saving changes to a report, use the Undo function to recover the previously saved version of the report.
Note that the Undo Reports button can revert to the previously saved version of the report. Suppose you generated a Report 'A'. Now you made a change and generated a Report ‘B’. Again you made a change and generated a Report 'C'. So in this case, the Undo Reports button can revert to Report 'B'. It cannot revert to Report 'A'.
Please refer below example to understand the functionality of Undo Button.
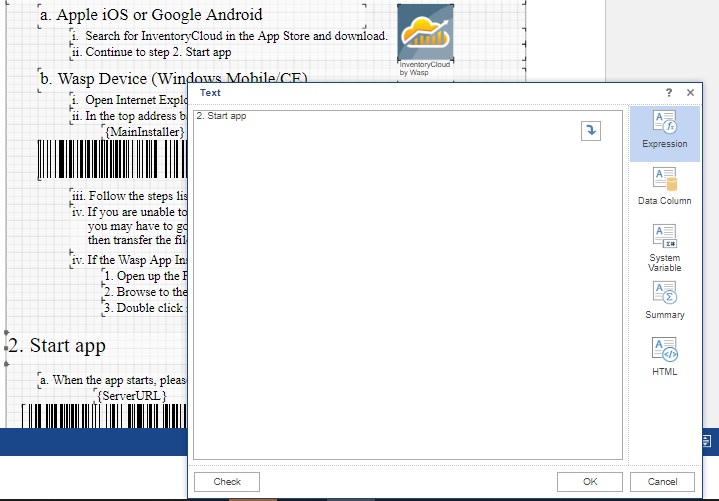
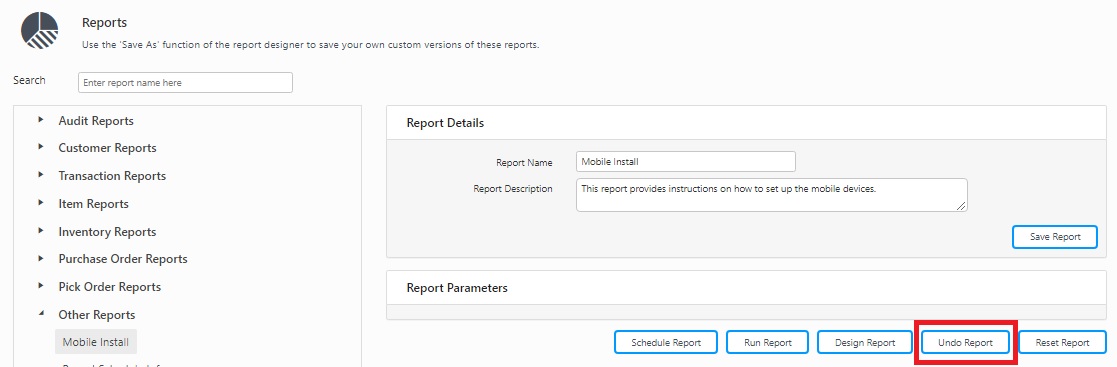
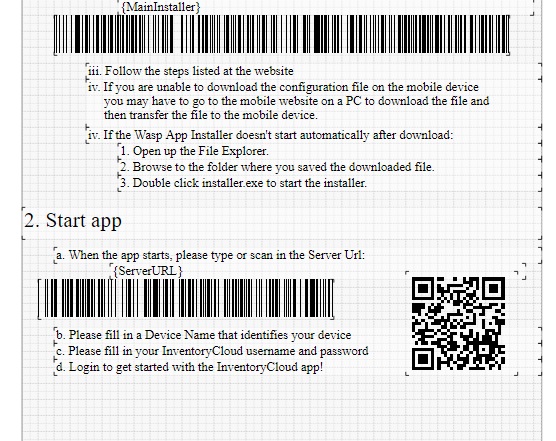
- Click on All Reports >Other Reports > Mobile Install. Click on the Design Report button.
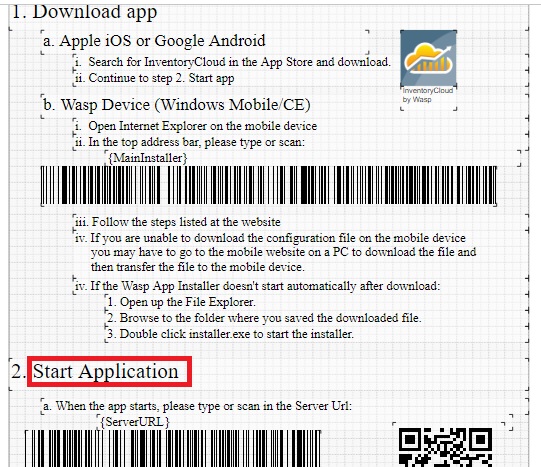
- The Design Report will open in a new tab. Make the required changes in the Report. For example, - In the figure below, the word "Start app" is changed to "Start Application". Click on the Save button.
- When you click on the design report again, the "Start app" will be "Start Application" as shown below:
- In the Report screen, the Undo Report button will be enabled. Click on the Undo Report button.
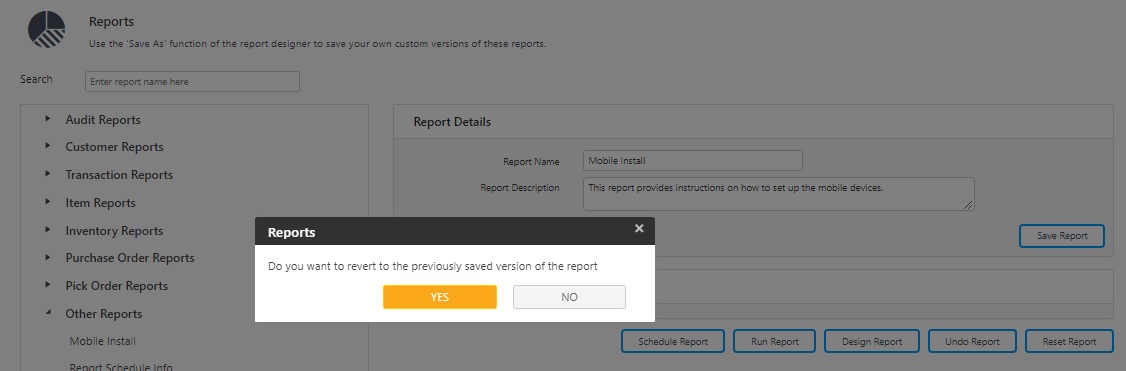
- A message will appear asking the user if they want to revert to the previously saved version of the report. Click on the Yes button.
- Click on the Design Report again to view the previously saved version of the report.
Reset Report
This feature resets the report parameters to their default values.
After setting the parameters for a report, you can clear out any selections you have made by clicking the Reset Report. Reset Report should also be selected after an update to InventoryCloud in order to make sure you have the latest version of the report.
FAQs - Refer to Knowledgebase - Knowledgebase > Cloud for FAQs.
Example:
- How can I add a Prompt at Print object to my labels?
- How to add fields such as Site and Location to the Inventory labels
- Add a grand total to the Inventory Cost Report
- How to add a page number to a report
- Reports with monetary totals show unexpected values
- How to apply formatting to a custom field added to a report
- How can I add a digital signature to a PDF export in Report Designer?
- Reduce size of (shrink) report band objects
Note: Use of the resources described here require internet access.