Single Sign On (SSO)
Single Sign On (SSO) allows your users to log on to InventoryCloud using their network credentials. This eliminates the need to create and remember a separate username and password for InventoryCloud. Note that WASP mobile applications do not currently support Single Sign-on, they use username-password authentication. You can set the password by editing user properties.
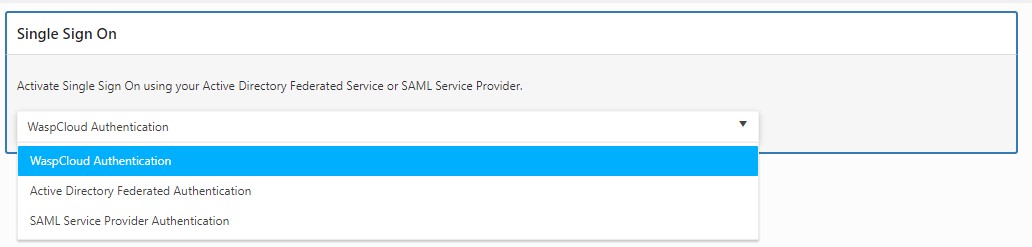
When you access the Single Sign-On Settings in the Settings menu in the InventoryCloud application, there are two options provided to activate Single Sign and they are Active Directory Federated Authentication or SAML Service Provider Authentication. WaspCloud is the default username password authentication you use when registering your user account.
After an SSO (Single Sign-On) option is selected and validated, users will not be authenticated by the Wasp login page. Instead, users will be authenticated by the SSO provider configured in the settings.
Only the Application Administrator is allowed to activate Single Sign-On.
Note: Both ADFS and SAML require the email to match. ADFS requires the group to match. For SAML 2.0 SSO the matching group is optional but will be enforced if that claim is mapped. See Claim mapping in the topic - Configure SAML IdP using Google App, Configure SAML IdP using OneLogin, Configure SAML IdP using ADFS/Azure for more details.
Note: There are steps that must be completed prior to activating Single Sign-On. We strongly encourage users to review the topic Active Directory Federated Services (ADFS) - Configuration & Security Assertion Markup Language (SAML) – Configuration for more information.
Note: SSO is only available to users who have verified their emails, not the admin account.
Note for On-Premise Users:
Please note that the Single Sign-On Section in the setting will NOT EVEN BE VISIBLE until you perform the prerequisites mentioned below. If the Single Sign-On Setting is not visible, please make sure that the below prerequisites are configured.
- To improve all-round security, you should activate an SMTP server. (OP by default now works without an SMTP server.)
- You should invite a new admin user to start configuring Single Sign-on. It’s less secure to use that default admin account.
- You must implement HTTPS for IIS and access the Wasp cloud site using exclusively HTTPS.
- Depending on the OP product installed, you would need to modify the HTTPS address in the Asset Cloud Service (MVC) or the Inventory Cloud MVC (ICMVC) in the Wasp Configuration tool (Refer to Wasp Configuration Tool). After that, verify, save, and reboot /restart everything. Once HTTPS has been configured, tested and validated using the Wasp Configuration tool, we recommend removing the HTTP binding in the IIS.
- You must have access to your SAML 2.0 IdP configuration console because some configuration is necessary on both ends, Wasp and their SAML server.
WaspCloud Authentication
WaspCloud Authentication uses default username and password authentication. When WaspCloud Authentication is selected, you will need to invite users, who will create user names and passwords specifically for InventoryCloud.
Active Directory Federated Service
Active Directory Federation Service (ADFS) is developed by Microsoft to provide a Single Sign-On (SSO) authorization service (i.e., allowing the user to access applications) on Windows Server Operating Systems using a single set of login credentials. It makes use of the claims-based Access Control Authorization model to ensure security across applications using the federated identity. Claims-based authentication is how an application acquires Identity information about users. The claims are packaged into a secure token by the identity provider. Steps include:
- Review Prerequisites/User Requirements
- Add and Configure a Relying Party Trust
- Create the claim rules for issuing claims.
- Attribute Mapping to the Relying Party Trust
- Enable SSO for the InventoryCloud application
Note: You must make sure that one of your active users has an email address and role that matches an ADFS account. Otherwise, you will be locked out of the application.
Single Sign-On via ADFS requires an HTTPS front end. You can configure the On-Premise site itself to use HTTPS itself or if you’ve set up a separate HTTPS firewall specify that HTTPS entry point using the config tool. Refer to Wasp Configuration Tool.
Refer to the below topics to Configure SSO using Active Directory Federated Services (ADFS) for details:
Steps to activate Single Sign On (SSO)
Active Directory Federated Services (ADFS) – Configuration
Security Assertion Markup Language (SAML)
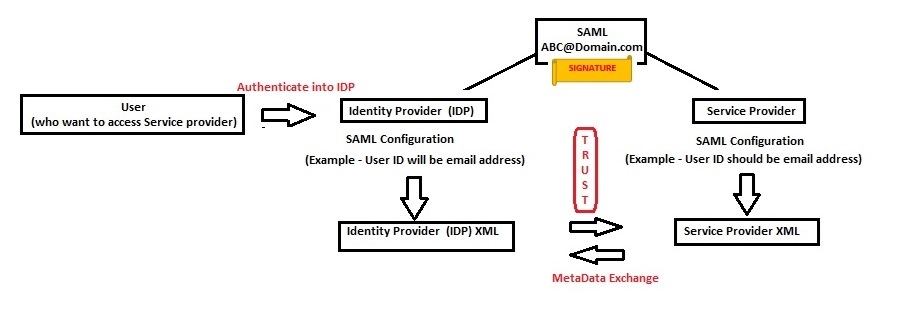
Security Assertion Markup Language (SAML) provides single sign-on to web-based applications. The protocol can be used for authentication as well as authorization. SAML protocol has three entities and they are User – Web Browser, Service Provider (SP), and Identity Provider (IDP).
To Configure the SAML Federation, a trust relationship must be established between the Service Provider and the Identity Provider.
Initiating the Flow of Authentication - SAML 2.0 encompasses both IDP-initiated authentication as well as SP-initiated authentication but Wasp Cloud software only supports SP-initiated authentication requests.
In SP-initiated authentication requests, the user first reaches out to the Service Provider. Since the user is not authenticated the Service Provider will redirect the user to the IDP. Configure SAML Idp using your preferred Identity providers.
Note - In the Security Assertion Markup Language (SAML) - Configuration topic, we have included detailed instructions on how to set up Wasp as a SAML 2.0 SP using One Login, ADFS/Azure, and GoogleApp. Wasp Cloud software is compatible with any SAML 2.0-compliant identity provider. If you use an identity provider other than those three mentioned above, It is likely that you will still find similarities between your SAML 2.0 compliant identity provider and at least one of the Idp's listed above.
Setup & Authentication - The user who wants to access the service provider must authenticate into the IDP. Once the setup is completed, the IDP will know the users and their attributes.
SAML Assertion – The IDP generates the SAML assertion if the user is authorized and successfully authenticated. The Assertion contains the user identifier and it is sent to the Service Provider for validation.
Signature & Issuer - The Assertion cannot be sent in plain text or completely unprotected, so the IDP must first sign the assertion (Signature). This way the Service Provider can validate the issuer of the assertion and thereby trust can be established.
- Metadata - When the assertion is sent to the Service Provider, it reads the user identifier and tries to map it to a user in its own database. For the federation to work, the email claimed by the identity provider must match the email of a registered Wasp user. Both the Service Provider and Identity Provider should have the same email address as the User Identifier and the format should be email. If the configuration matches on both sides, then only the SAML assertion can be mapped to a user at the service provider, and thereby the service provider can allow access. These Configurations can be entered manually into your Service Provider or IDP. You can also collect the requirements and capability into an XML metadata file. This file contains the settings and the certificate of the system. Using the certificate, the receiving end can validate the signing of the assertion and know it came from the trusted party. This metadata exchange is what establishes trust.
Refer to the below topics to Configure SSO using Security Assertion Markup Language (SAML):
Configure SAML IdP using Google App
Configure SAML IdP using OneLogin
Configure SAML IdP using ADFS/Azure
Settings Import and Validation
Steps to activate Single Sign On (SSO)
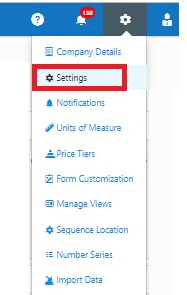
- Click on the Settings icon, then select Settings.
- Under Settings > Single Sign On, select Activate Single Sign On.

- The following are the options:
- Wasp Directory Authentication - When this option is selected, you will need to invite users, who will create user names and passwords specifically for InventoryCloud.
- Active Directory Federated Authentication - Select this option to activate single sign on. This causes InventoryCloud to utilize the user's network credentials for authentication.
- SAML Service Provider Authentication - Select this option to activate SAML-based SSO. Using SAML-based SSO, Single sign-on (SSO) lets users sign in to all their enterprise (complete edition) cloud applications using their managed Google account credentials, OneLogin account credentials, or Azure and/or Active Directory domain account credentials.
Active Directory Federated Authentication
- Enter the Metadata URL, then click on the Validate button. This is the URL for your ADFS server.

Note for On-Premise Users: Please note that the ADFS/SAML Validate button will be disabled if “Register users without SMTP” is checked. Also, If the SMTP settings (in the Email Settings option) are invalid, the ADFS/SAML Validate button will be disabled. The users should set up SMTP settings before they attempt the ADFS/SAML setup.
- Is Federated Services Configuration Valid - It only appears indirectly via the success message after validation.
- After the connection to the ADFS server is successful, the login type is automatically changed to AD login which indicates that a valid setup is configured. Note: Please note that If ADFS is selected, the login screen will not appear. The login screen will appear when the Single Sign On setting is changed back to WaspCloud.
- After the connection is made, the Thumbprint and Ignore Chain Errors fields are activated.
- When you access some https site with an expired or a self-signed certificate. The browser will ask if you trust the certificate anyway. If you do trust it, the browser won't bother you when you again visit the page next time. So, the Thumbprint lets you safely ignore some errors involving certificate validation by stating ‘I trust this certificate with thumbprint "xxxxx" even without full chain validation, as long as it’s the same certificate.
If there is a problem with the certificate (if you receive an error that the certificate can't be verified, for example) you can select the Ignore Chain Errors check box. When selected, InventoryCloud will ignore the warning and create a Thumbprint for the certificate.
Keep in mind that while Ignore Chain Errors and Thumbprint creation are allowed, Wasp Technologies does not recommend using these options unless the certificate error is part of the user's normal configuration. If utilized, Wasp recommends researching and determining what the problem is with the certificate going forward.
Note: When the certificate expires, Single Sign On will be disabled and users will need to log in using InventoryCloud username and password.
SAML Service Provider Authentication
- SAML Url, Certificate, Issuer, SAML Validation and Include AuthnContext - Refer Prerequisites, Configure SAML IdP using Google App, Configure SAML IdP using OneLogin, Configure SAML IdP using ADFS/Azure, and Settings Import and Validation.
SAML Validation - Always force SAML signature validation. Refer to the topic Validation.
RequestedAuthnContext is an element in the SAML Authentication Request that we send to SAML security providers during the saml service provider-initiated authentication flow. This element is now optional.
Note for On-Premise Users: Please note that the ADFS/SAML Validate button will be disabled if “Register users without SMTP” is checked. Also, If the SMTP settings (in the Email Settings option) are invalid, the ADFS/SAML Validate button will be disabled. The users should set up SMTP settings before they attempt the ADFS/SAML setup.
Active Directory Federated Services (ADFS) – Configuration
Note: Wasp On-Premise products are released without https support. Without https you can not activate Single Sign on (SSO) using ADFS. To edit the MVC callback, refer to the topic Firewall.
Following are the steps to add a configuration to ADFS server for any tenant you wish to use:
- Start the ADFS Management console.

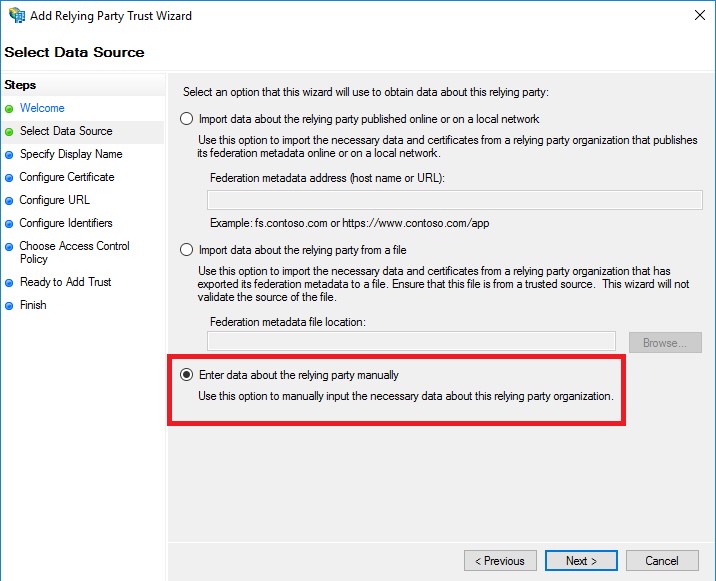
- Select Add Relying Party Trust. Click on Start button to add a Claims aware Relying Party Trust.
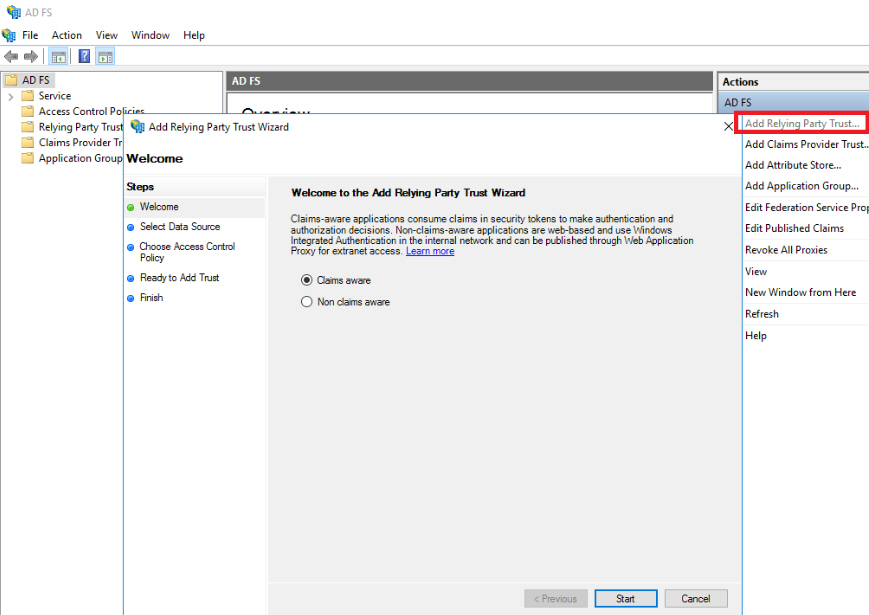
- Select “Enter data about the relying party manually”. Click on the Next button.
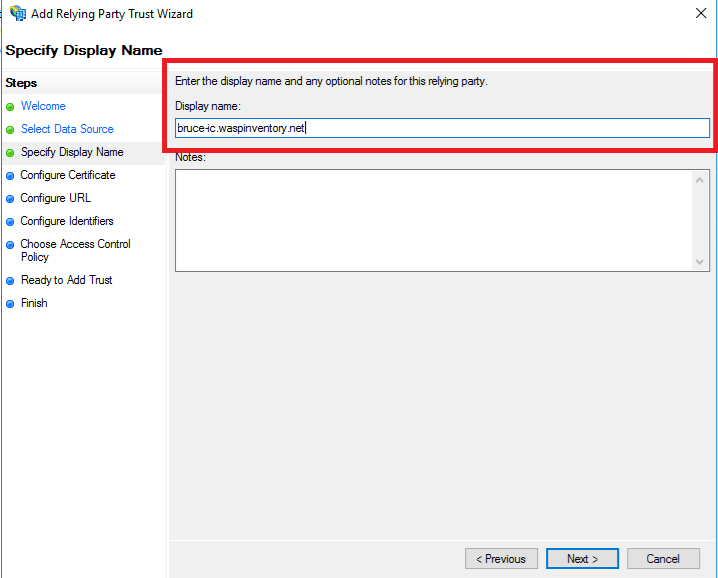
- Enter a display name for your tenant. We suggest you to add your host name cdc.waspassetinventory.com in the Display name field. Click on the Next button.
Note: Please enter your own tenant name in the Display Name field.
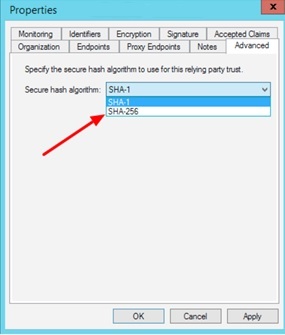
- Right-click on the Display Name in the Relying party trust and select Properties. Select the Advanced tab and select the secure hash algorithm SHA256.
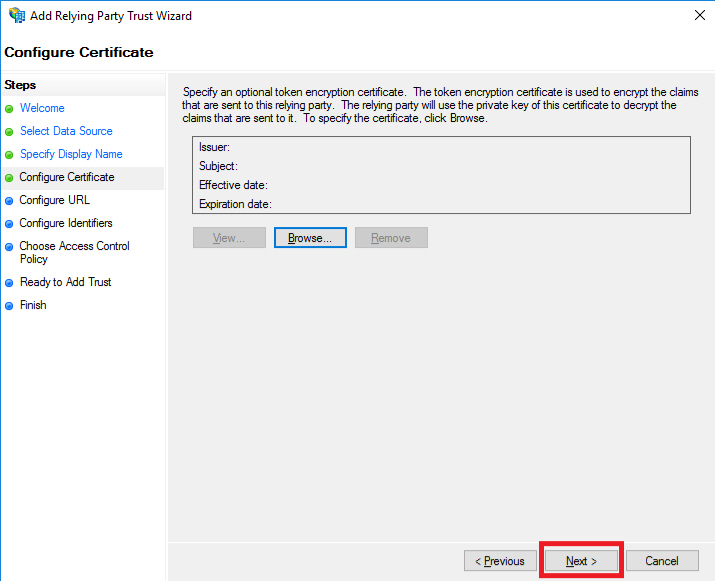
- ADFS uses the SSL certificate for security. Wasp does not support additional encryption certificates beyond SSL at this time. Click on the Next button.
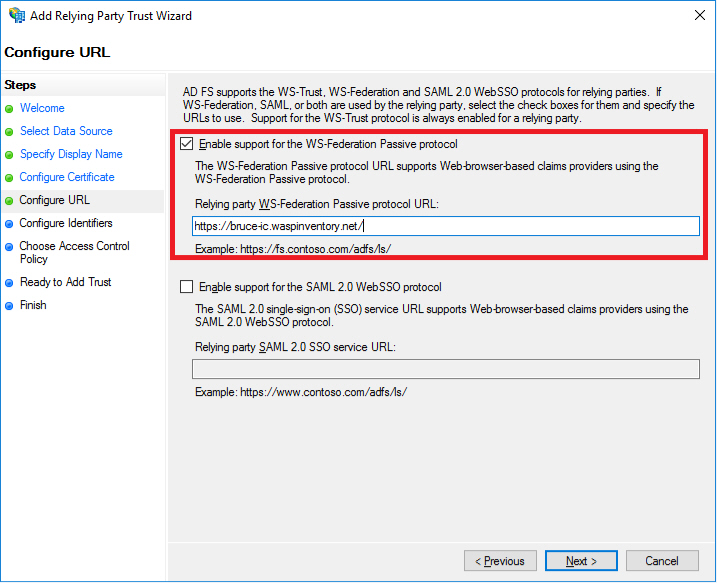
- Every Wasp tenant with the Active Directory feature supports WS-Federation Passive Protocol. The trailing slash is important. Enter your host URL https://cdc.waspinventory.com/. Click on the Next button.
Note: Please enter your own host URL with a trailing slash.
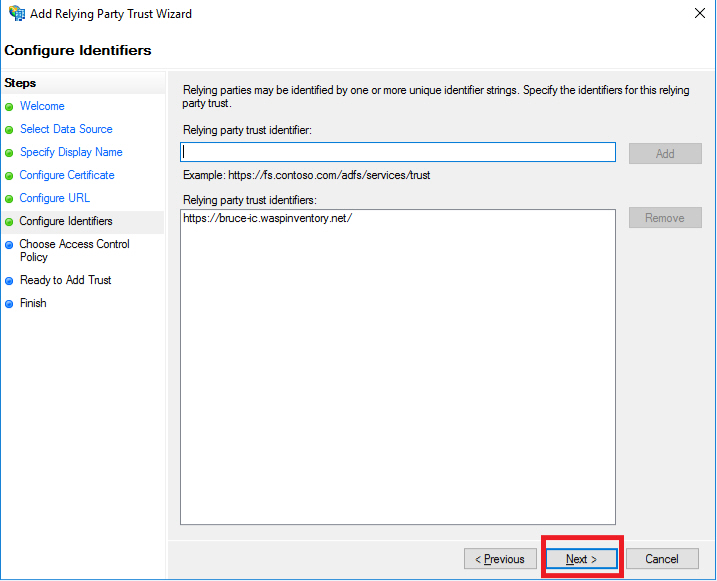
- Your tenants URL, with trailing slash is the only Relying Party trust identifier we need. Click on the Next button.
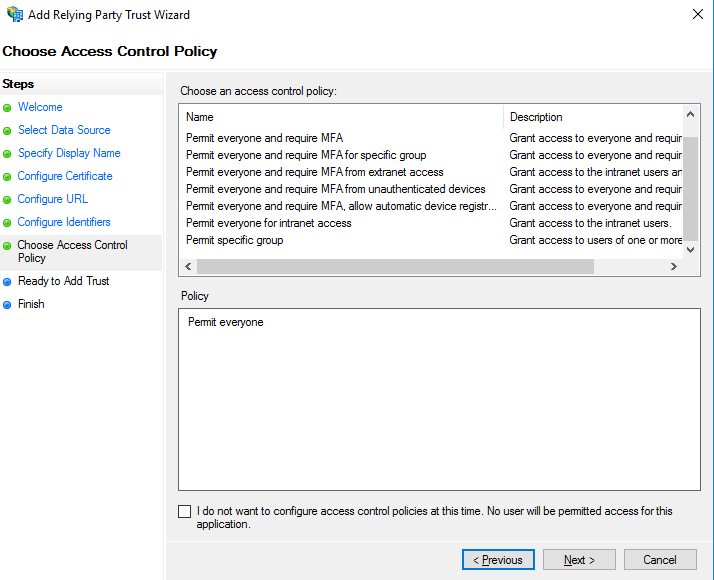
- Specify your internal user access control as you see fit, then click Next.
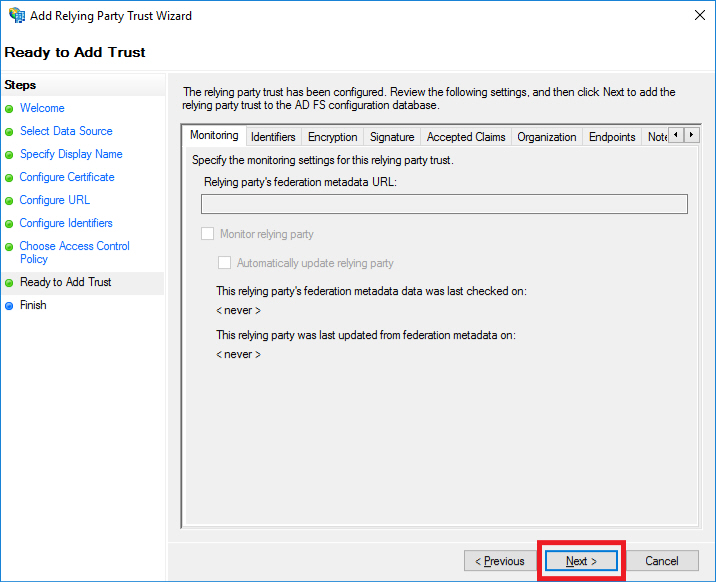
- We have already specified everything we need for the trust itself. Click on the Next button.
- We need to specify the claims returned during authentication. Click on the Configure claims issuance policy for this application checkbox.
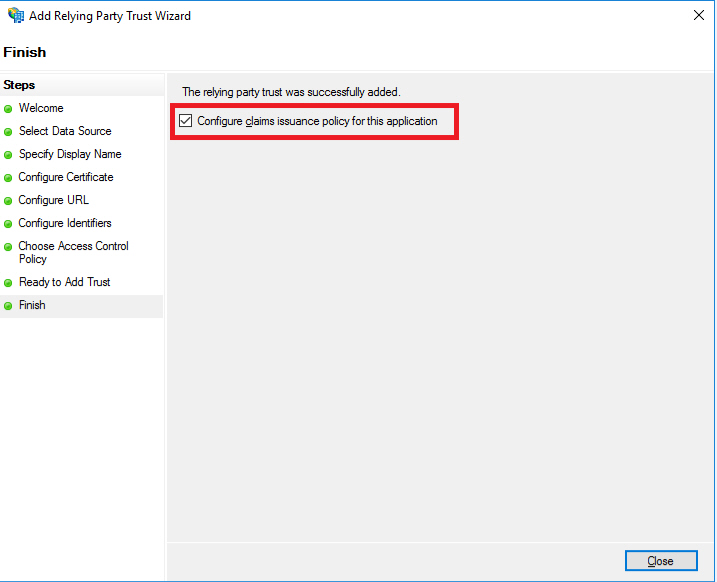
- Click on Edit Claim Issuance Policy to Add the Rule for issuing claims.
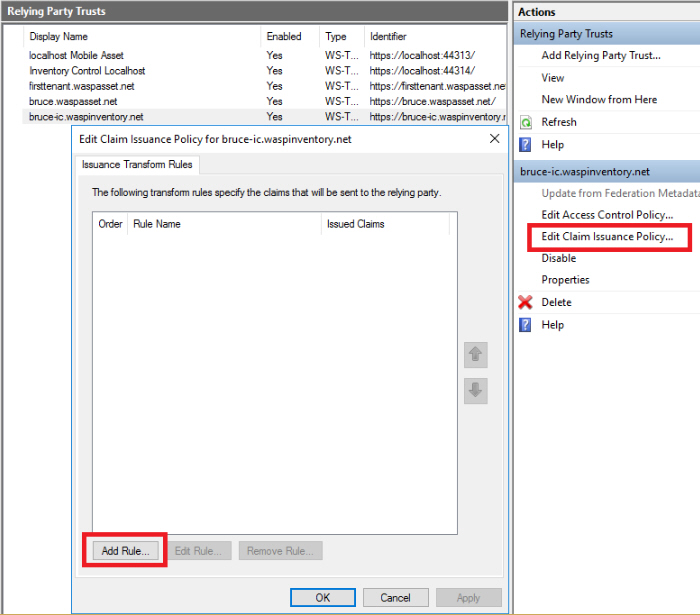
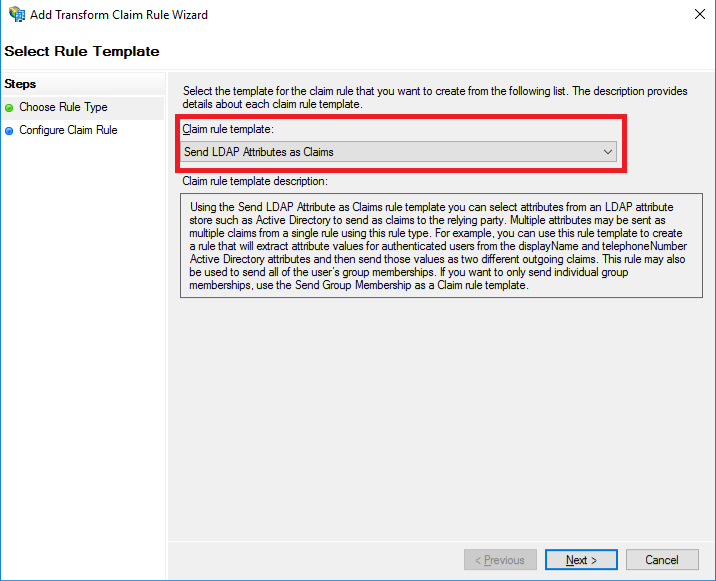
- Accept Send LDAP Attributes as Claims, Hit on the Next button.
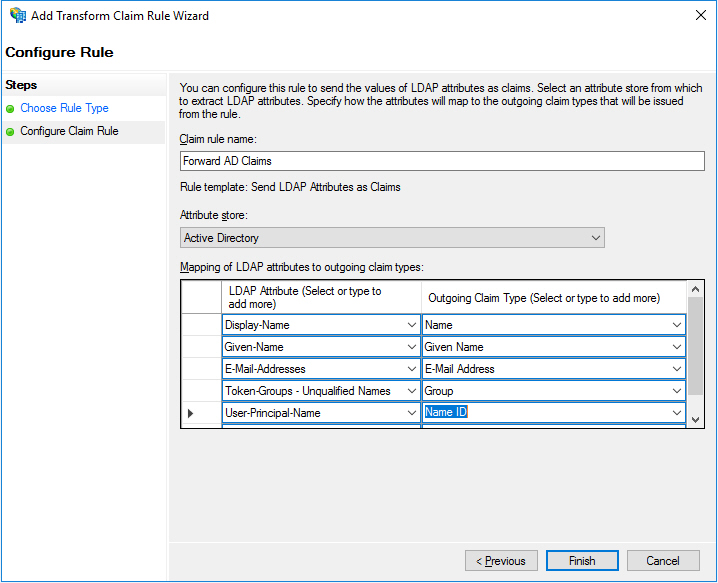
- Specify the claims as shown below, then click the Finish button.
- Creating Users: Please note that after setting up ADFS, the users are not automatically created. It must be manually created.
- Email - The email returned by ADFS must match the email of the person configuring ADFS during validation. The email returned by ADFS must match the email of every user during registration and login as well. The email is used to find the Wasp user account during ADFS login. If the Active Directory email for a user changes that users email in wasp must also be changed to match or the user will need to accept a new invitation and registration.
- Group - During Validation and login ADFS (given the above claim configuration) returns a list of group names. The Wasp users role must exactly match one of the groups returned by ADFS. Otherwise Validation, registration and login will fail.
- Wasp User name - The Wasp User name and password will be used by users to log into mobile devices. The Reset Password link on the user properties page should be used to set the password for mobile devices. The one issue is that the user can not change the user name and this is normally a part of the wasp user registration process. But during user registration with SSO, we validate primarily against ADFS. The Wasp user name is not validated during ADFS registration. To fill this gap, the registration page will automatically use the users email as the user account name for mobile login purposes.
- Testing - ADFS Validation is based on cookies. This makes many testing scenario difficult. For example - if you invite a new user then try to register using that link, the cookies from the ADFS will match the inviting user, not the invited user. An easy way to circumvent that problem is to
- Open the registration mail.
- Right-click the registration link and copy.
- Open a different browser (For example IE vs Chrome).
- Paste the link there to complete the user registration process.
- Tenant Provisioning – Initial User - Freshly provisioned tenants do not have SSO activated so the initial user invitation and registration will work as it always has.
- If, you experience unexpected errors after configuring your ADFS server in the Wasp Settings (SSO) ,information about most errors can be found in the event log of the server hosting ADFS.