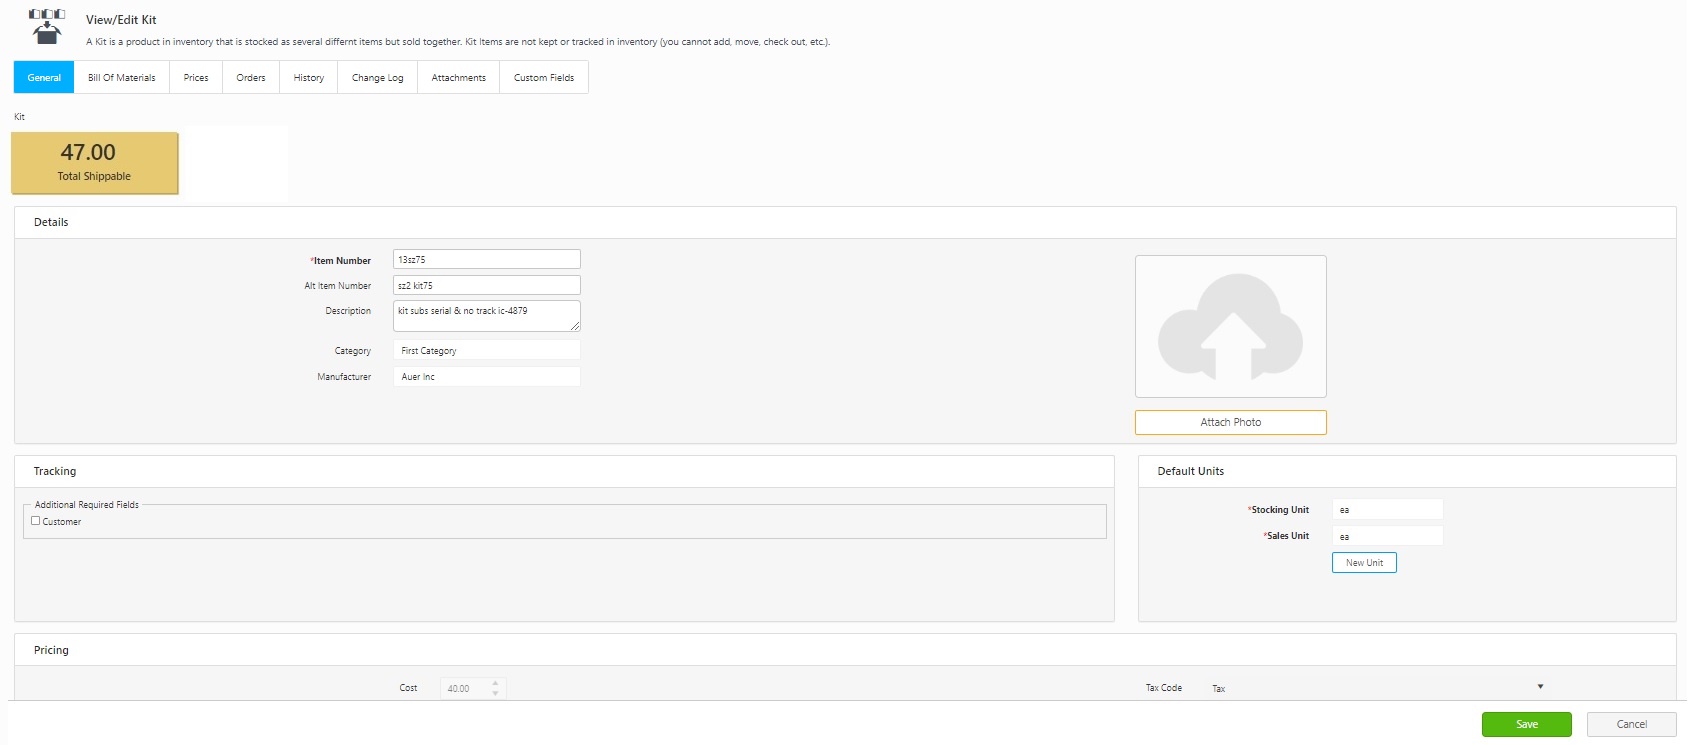
New Kit
Kit items are a group of items that are sold together but are still considered separate inventory items. As opposed to Assembly Items, you cannot add inventory, move or check out/check in Kit Items. While Assembly Items can be created in advance (pre-assembled) and kept in inventory, Kit Items are created at a pick or remove time.
Note: The General Information Tab, Bill of Materials Tab, Prices Tab, and Attachments Tab in the View/Edit Kit screen is similar to the New Kit screen.
Accessing the New Kit Screen
Click on the Item > New Kit.
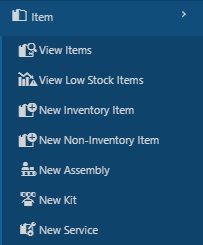
The New Kit screen will appear.

Adding a New Kit
The General Information tab is where you will enter the basic information.
- Item Number (Required) - The Item Number is often available on a barcode label already attached to the item, such as a UPC code or SKU number. Using an existing barcode for the Item Number allows you to scan or manually enter the number from each item as it comes in without having to print and affix your own barcode inventory item labels. Item numbers in Inventory Cloud cannot exceed 31 characters. Do not use a description as the item number. You should enter a numeric value in the Item Number field. A description of the item can be entered in the Description field.
Automatic Item Numbers: If the Automatic Item Numbers option is selected in Settings > Item > Automatic Item Numbers, the Item Number field will appear populated with the next number in the sequence. For example, if you just created item number 1001, the next number will be 1002. For further information on this option, please refer to the Settings topic.
- Alternate Item Number- Enter an alternate item number.
- Description - Enter a description.
- Category - Select the category. This field is optional and provides another way to sort and group your items. The categories you have already created will appear in a drop-down list.
- Manufacturer - Select the manufacturer. This is the entity that manufactured the item. This field is optional and provides another way to sort and group your items.
- Tracking - Additional Required Field - This section contains a checkbox that acts much like the Tracked-By boxes. The additional required field (optional) is the customer. Click on the checkbox to enable the "Customer" tracking. For example, if the option is not enabled for the customer code field, a user adding inventory can enter a value for the customer code if he knows it or skip entering a value if he doesn't. If this option is enabled, a customer code is required to complete the transaction.
- Default Units - The default units section lists how you want your inventory to be stored. These are the Base Unit, Sales Unit, and Purchase Unit. Select a unit of measure from the dropdown for each unit type. You can add a new unit of measure by clicking the New Unit button.
- Stocking Unit -: At the item level, this should be "Eaches", meaning you should enter how you want each item of this type to be measured. (Examples: bag, barrel, basket, block, bottle, box, carton, container, drum, gallon, jar, pack, package, pallet, section, tub, vial, etc.). When entering the base unit, you need to pick the smallest unit of measure that you will use to remove a whole item. A good test to use when deciding what the stocking unit should be is to think about your answer if you were asked to count how many of these items you have. If the answer is 100 feet of rope, "feet or "ft" is the stocking unit. If the answer is 20 scanners, then "each or "ea." is the stocking unit. Each is common when the unit itself is not a standard unit of measure. If the answer is 100 boxes of nails, then "box" or "bx" is the stocking unit. Refer to the topic How to use Units of Measure of different types.
- Sales Unit - This is the unit of measure used when you sell an item. For example - you may have a base unit of Carton that holds 10 boxes of nails but sells them by the box. In this example, the Sales Unit would be the box. Refer to the topic How to use Units of Measure of different types.
- Pricing
- Cost (required) - Cost specifies the amount your company paid to get this item into inventory. Cost handling in InventoryCloud is designed to show you the average cost and current value of your inventory. You can use this cost information for other purposes as well, such as determining pre-tax and purchase order totals and receiving totals. This amount represents your cost for purchasing one of the base units for this item. If one Barcode Laser Scanner costs $300.00, you will enter 300 into the cost field. If you have items in your inventory that are sold in fractional quantities, you will need to decide which stocking unit to use. For example, if you have rope as an item and it costs you $0.12 a foot, you would enter 12 in the Cost field and Feet as the Stocking Unit (entered on the Additional tab). If you rarely sell the rope in exact multiples of feet, you may want to enter your Stocking Unit as Inches, since this is the lowest unit measured, and enter your cost per inch in the Cost field. It is up to you how you want to calculate this; however, you should make sure that the Cost you enter is the cost for one whole Stocking Unit (either feet or inches, in our example).
Keep in mind that you can enter a new cost on the Add Inventory screen if you purchase this item at a discount. For more information on Cost Tracking and Average Costing, please click here.
- Use Total Cost of BOM - Click on the checkbox, if you want to use the total cost of BOM (bill of material) as cost.
- List Price - This field specifies a manufacturer's list price for an item. This field is for your information only and is not included in any reports.
- Sale Price - This field specifies the price at which you sell an item. This field is for your information only and is not included in any reports. The price entered here is the price that appears in the Price field on Pick Orders.
- Tax Code - You can optionally select whether this item is taxable or non-taxable.
- Average Cost - This is a calculated value that averages the cost paid for the current quantity. This will be blank when you are entering a new item but will appear when you are viewing the Edit Item screen for an item that has inventory (quantity). When calculating Average Cost, the software does not include records that have an average cost of zero. When you run an Inventory Cost Report, the software does include zero-cost quantities when calculating Total Cost.
- Attach Photo - You can add a photo if required.
- Click on the Attach Photo button. The Attach Files screen will appear.
- Click on the Select Files button.
- Drag and Drop - You can drag a file from a folder in Windows Explorer and drop it into the Attach Files window. Make sure the Select Files area is highlighted before dropping.
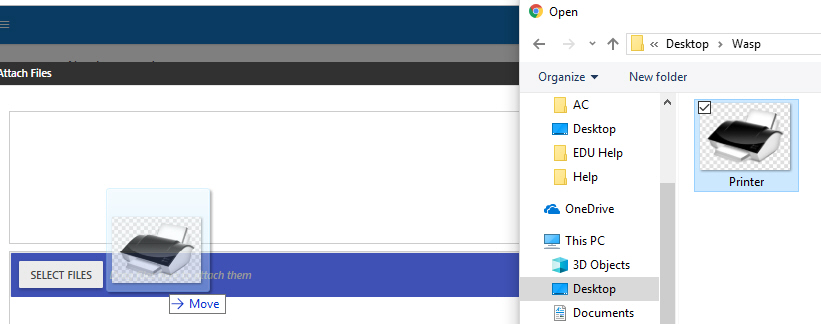
- Select Files - Click the Select Files button to open the standard Windows Explorer window. Navigate to the file you want to add, then click Open. The files you attach will appear in the window:
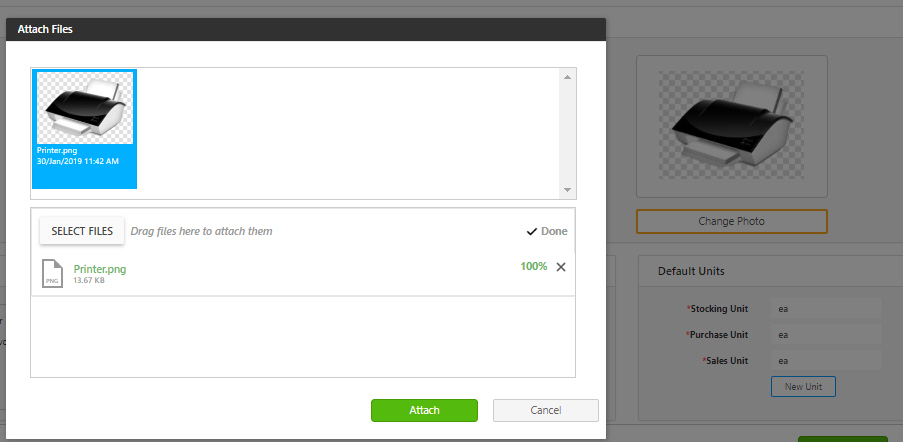
- Click on the Attach button. The photo will appear in the photo section. Click on the Change Photo to access the Attach Files screen and to select a different photo.
Bill of Material Tab
This tab is where you will indicate which items you want to be included in this Kit.
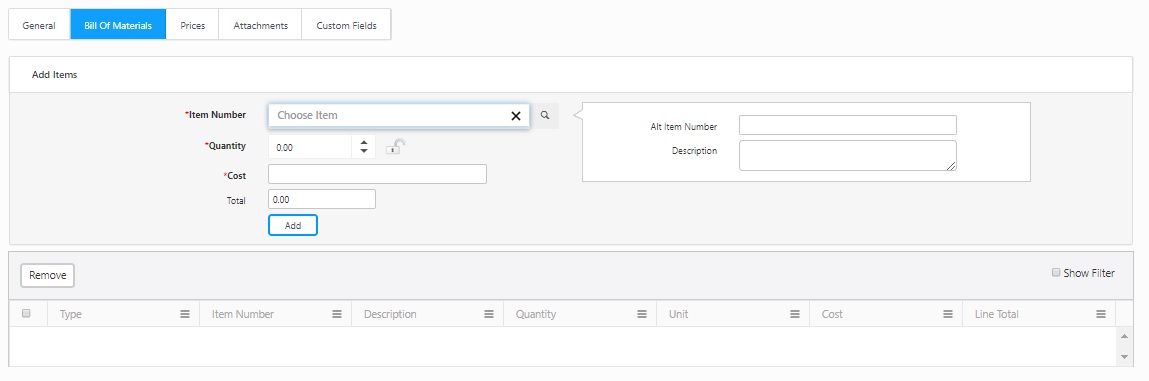
- Item Number (Required) - Enter the Item or select the item from the drop-down list. The Alt Item number and Description will automatically get populated on selecting the item number.
- Quantity (Required) - Enter the quantity of the item that is required for a Kit.
- Cost - This cost will automatically get populated if the value is entered while creating the item.
- Total - This field will update based on the Cost and the Quantity entered.
- Click the Add button when you have finished selecting the item. The item will be added to the list at the bottom of the screen. To remove an item, select the item by clicking on the checkbox and then click on the Remove button.

- Similarly, add more items to complete the bill of materials.
- Click on the Save button when you are finished adding items.
Prices Tab
Tier pricing is a promotional tool that lets you price items differently for different products, categories or customers. This is an effective way to move more merchandise.
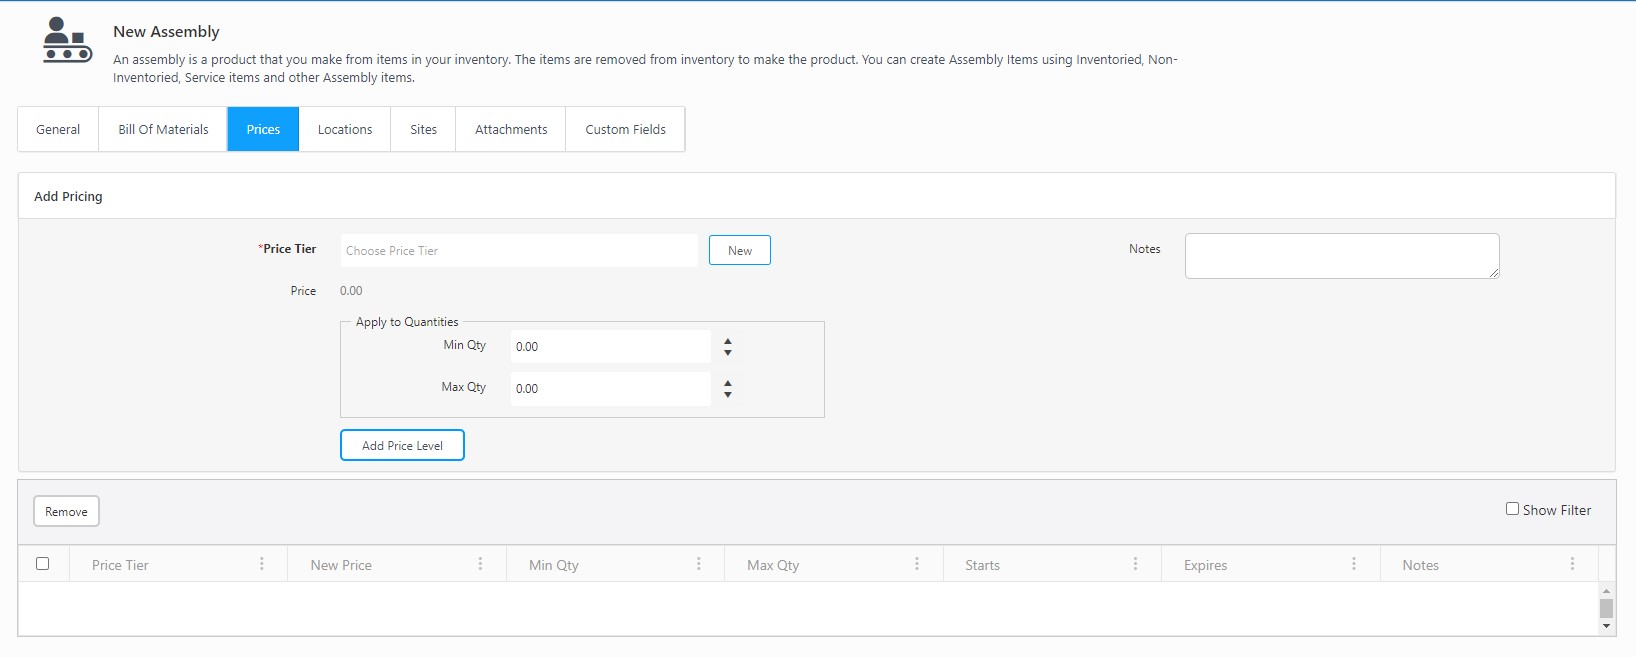
- Price Tier (Required) - Enter the price tier or select the price tier from the drop-down. Click the New button to access the New Price Tier screen.
- Min Qty - Enter the minimum quantity that must be purchased to qualify for this price tier.
- Max Qty - Enter the maximum quantity that can be purchased to qualify for this price tier.
- Notes - Enter any additional information in the notes field.
- Click the Add Price Level button to add the selected price level to the Kit. The Price Tier will be added to the list at the bottom of the screen. To remove, select the price tier by clicking on the checkbox next to it and then click on the Remove button.

Attachments Tab
To attach any document to this item, click on the Attachments tab:

Adding an Attachment:
- Click on the Attach Files button. The Attach Files screen will appear.
- Click on the Select Files button.
- Drag and Drop - You can drag a file from a folder in Windows Explorer and drop it into the Attach Files window. Make sure the Select Files area is highlighted before dropping.
- Select Files - Click the Select Files button to open the standard Windows Explorer window. Navigate to the file you want to add, then click Open. The files you attach will appear in the window:
- Click on the Attach button.
Delete an attachment:
To delete an attachment from the Attachments tab click on the trash can icon next to the attachment you want to delete.

Edit an attachment name:
To edit the name of an attachment, click on the Edit icon.

The File Name becomes editable.

Make changes as needed, then click the Update button.
Saving the New Item
Once you complete entering all the information, click on the Save button at the bottom of the screen. The screen will navigate to View Items screen and a message will appear indicating that Item is successfully created and it will also display the Item number.

If you want to create another new kit after saving the existing kit, then click on the Save and add another checkbox before saving. On saving, the New Kit screen will appear again along with the save message indicating that Item is successfully created and it will also display the Item number.

Editing a Kit
- Click on Item > View Items.
- Search for a kit - item number that you want to edit.
- Click on the item number.

- View/Edit Kit screen will appear.
- Edit the fields that require an update. The View/Edit Kit screen will have two additional tabs and they are the Orders and History tab.
Note: The General, Bill of Materials, Prices, and Attachments tab in the View/Edit Kit screen is similar to the New Kit screen. Refer to Adding a New Kit for more details.
Total Shippable - indicates how many items are total shippable i.e. the system will automatically calculate the number of kits that can be formed as per the list of quantity available. Refer to the topic Adding a New Kit - General tab for more details.
The Orders tab will list the pick orders associated with the item. The orders tab will display the Order Type, Order Number, Order Date, Due Date, Order Status, Unit, Ordered Quantity, and Processed Quantity.
- Show Filter checkbox allows you to narrow down the displayed results to a range of items or a specific item.
- Group By checkbox allows you to "group" the displayed information so you can view data in a way that is most easy-to-read for you. You can have one group, two groups, or many groups depending on how you want to view your information.

- The Order Number is a link that will navigate to the View/Edit Pick Order screen, where you can edit the pick order. To View/Edit Pick Orders, refer to the topic View/Edit Pick Orders for more details.
The History tab will display all the transactions related to the Kit. It will display the Transaction Date, Transaction Type, Quantity, Customer, User Transaction Date, Has Notes, and Has Signature.
- Show Filter checkbox allows you to narrow down the displayed results to a range of items or a specific item.
- Group By checkbox allows you to "group" the displayed information so you can view data in a way that is most easy-to-read for you. You can have one group, two groups, or many groups depending on how you want to view your information.

Click on the Save button after updating the details in the View/Edit Kit screen.
Deleting a Kit
- Click on Item > View Items.
- Search for a kit - item number that you want to delete.
- Click on the checkbox next to the item number and click on the Delete button. A confirmation screen will appear. Click on the Delete button again.
