Notifications
Notifications are reminders or alerts about upcoming due dates, transactions, events, etc. These are created by users with Administrator privileges and can be set to appear on all or specified user accounts. Notifications can be set to be emailed to specific users and/or to appear in the Notifications section of Inventory Cloud.
Creating a Low Stock Level Notification
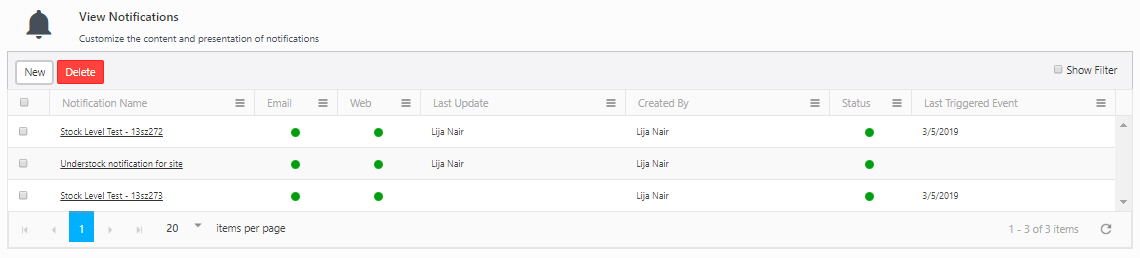
View Notifications Screen
- Click on Settings > Notifications.
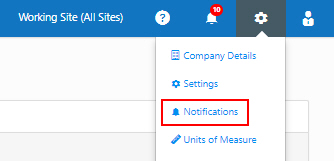
- The View Notifications screen will appear.

Create a New Notification
- On the View Notifications screen, click on the New button.
- The New Notification screen will appear.
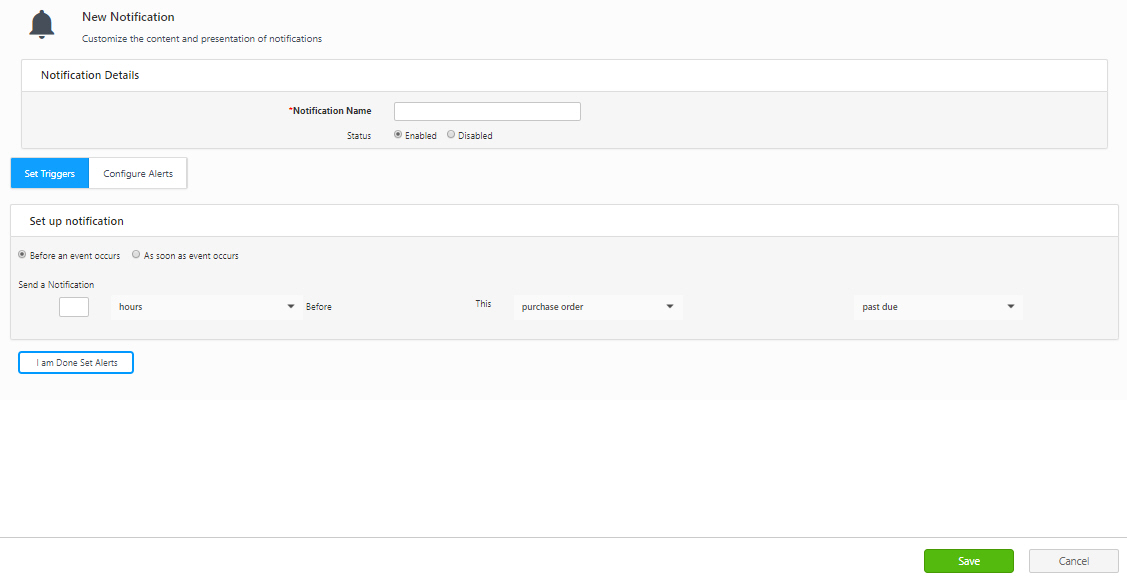
- Enter a name for this notification in the Notification Name field.
- Set the status of this notification to Enabled. By default, the status will be Enabled. If the status is set to Disabled, the notification will not be active, and the user will not receive email alerts. Also, the notification will not appear in the application.
- To set up triggers, click on the Set Triggers tab and to configure alerts, click on the Configure Alerts tab.
Set Triggers
The trigger can be set up before an event occurs or as soon as the event occurs.
Click on the Before an event occurs radio button.

Send a Notification
- Enter the number in the empty box. This field indicates the number of hours/days/weeks/months.
- Select hours/days/weeks/months from the drop-down list.
- This - Select purchase order/pick order/ Item/ a specific purchase order/ a specific pick order/a specific Item/audit window.
- The drop-down options in the following field will update based on the option selected in the This field. The options are - past due, expires & is due back (Item and a specific Item), ends &begins (audit window).
- Choose purchase order/pick order/ an Item/audit window name. This field will appear if you choose a specific purchase order/ a specific pick order/ a specific Item/ Audit Window in the This field.
- Click on the I am done Set Alerts button. The screen will navigate to Configure Alerts screen.
OR
Click on the As soon as event occurs radio button.
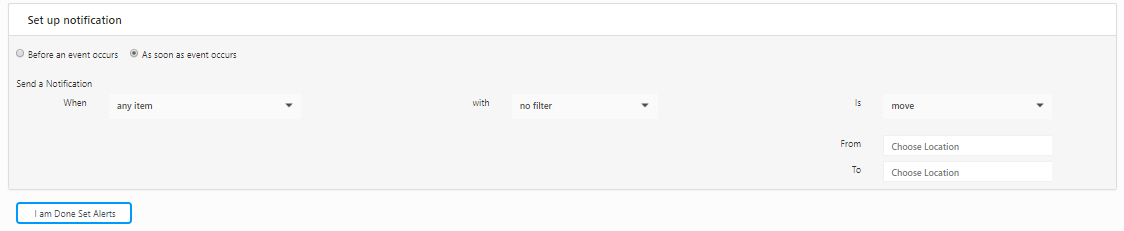
Send a Notification
- When - Select - any Item/ a specific Item/ any site/ any location/ any customer/ any manufacturer/ any vendor/ any purchase order /any pick order/ any import/ any full sync import in the When field.
- With - Select No Filter/ Stock Level. No Filter option is applicable for all. Stock Level is applicable for any Item and a specific Item.
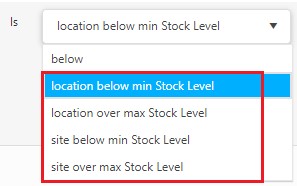
- Is - The Is options will vary based on the option selected in the When and With field. The options are:
- Created, deleted, and updated if you select any site/ any location/ any customer/ any manufacturer/ any vendor. Note - The notification will be triggered if any new or existing site, location, customer, manufacturer, or vendor is created, deleted, or updated.
- Created, deleted, updated, past due, and closed if you select any purchase order.
- Created, created for, picked for, completed, deleted, updated, past due, and closed if you select any pick order.
- Completed, if you select any import/ any full sync import.
- Any Item/ A specific Item & No Filter - The options will be move, checkout to, checkout, check-in, check in by, adjust, quantity removed, past due, quantity added, created, added, and deleted.
- Any Item/ A specific Item & Stock Level - The options will be below, location below min Stock Level, location over max Stock Level, site below min Stock Level, and site below max Stock Level. Note: The Stock Level notification will get triggered in the Transactions -> Move, Add, Remove, and Adjust screens.
- Choose the item number. The field will appear if you select A specific Item in the When field.
- Enter the "From location" and "To location" fields if you select Move in the Is field.
- Select the user and enter the customer number if you select checkout to or checkIn by in the Is field.
- Select the customer number. This field will appear if you select any pick order, no filter, and created for/ picked for.
- Enter the amount (i.e., quantity), site, and location details if you select Any item/ A specific Item & Stock Level combination.
Note - Basic editions may not support all notification types.
Click on the I am done Set Alerts button. The screen will navigate to Configure Alerts screen.
Configure Alerts
Configure Alerts screen allows you to configure alerts.
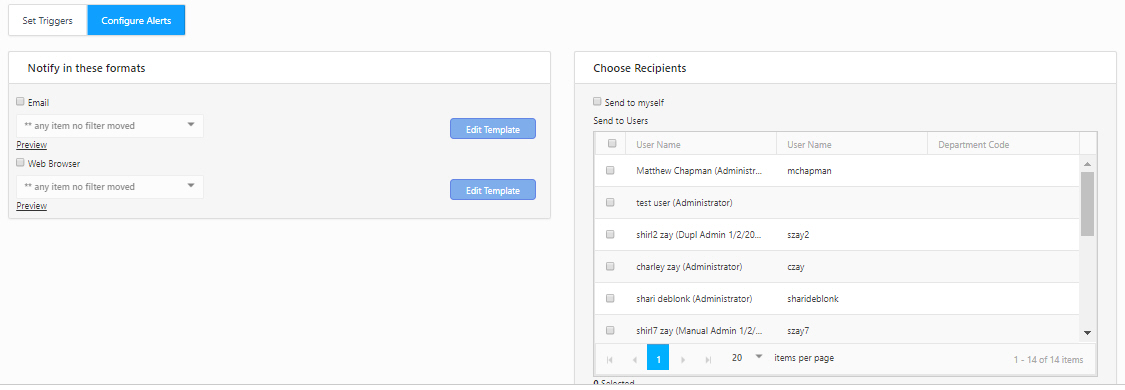
Notify in these formats
- The notification can be sent via e-mail or web browser. Click on the Email / Web Browser checkbox. You can select both checkboxes.
- Click on the Preview link for Report View.
- Click on the Edit Template button to update the template format. You can edit the wording of the alert too.
Choose Recipients
- Click on Send to myself / Send to Assignee checkbox. You can select both checkboxes. Note: Some notifications, like a Check Out Notification, will show additional checkboxes for the Assignee.
- Send to Users - Select the users for sending the notification updates by clicking on the checkbox(s). You can also select all the users by clicking on the checkbox next to the User Name field.
- Send to Roles - Select the roles for sending the notification updates by clicking on the checkbox(s). You can also select all the users by clicking on the checkbox next to the Role field.
- Send to these email addresses - Enter the email addresses.
Click on the Save button.
On the Configure Alerts tab, If an Email is selected, then an email will be sent to specified recipients. If Web is selected, the notification will appear in the Notifications section when the specified user logs in to the InventoryCloud application.
Creating a Stock Level Notification
The minimum and maximum quantities are added in the Site tab and Location tab on the New Inventory screen. The notification will get triggered in the Add / Remove / Adjust / Move transactions screen.
Steps to set up a low stock level notification for a specific item below stock level:
Note: Follow the same steps to create a notification for a "location below min Stock Level, location over max Stock Level, the site below min Stock Level, and site below max Stock Level".
- Click on the Settings -> Notifications -> New button.
- The New Notification screen will appear.
- Enter the Notification name.
- Set Triggers - Set up notifications:
- As soon as event occurs - Select a specific Item with a stock level below a certain amount. Select a site and/or location. Also, choose an Item number.
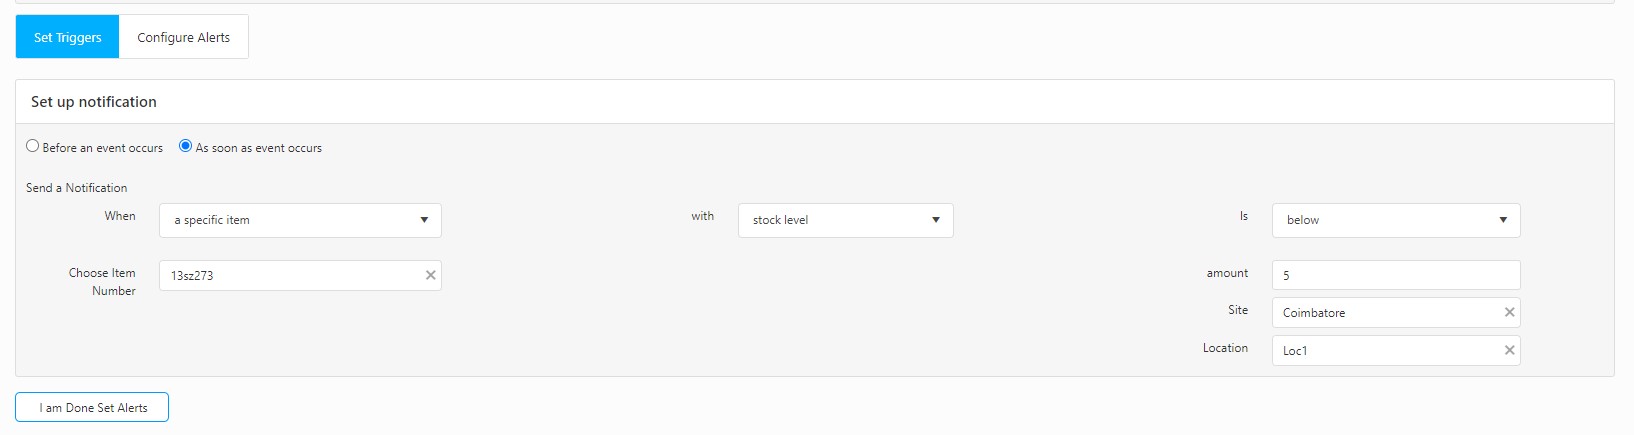
- Click on the I am Done Set Alerts button.
- Configure Alerts - Set up notifications:
- Click on the checkbox to notify the user in the format you want. Also, choose the recipients.

- Click on the Save button.
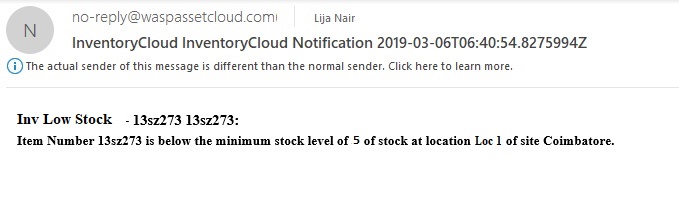
- During the Add / Remove / Adjust / Move transactions, if the quantity of the selected Item in a specific site/location is below the specified amount (amount entered in the Set Trigger screen example 300, refer to image above). The application will send an email to the provided email ID, and the notification will be triggered in the application.
Note: When the user configures a minimum stock level notification, it's important to note that they will receive only one email every 18 hours, irrespective of the stock levels fluctuating above and below the minimum threshold multiple times throughout the day.
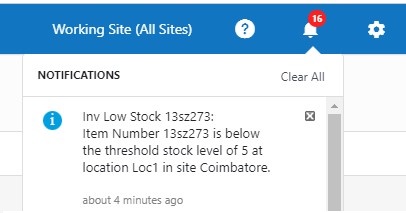
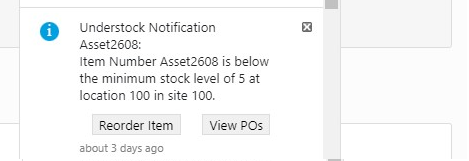
- Application Notification
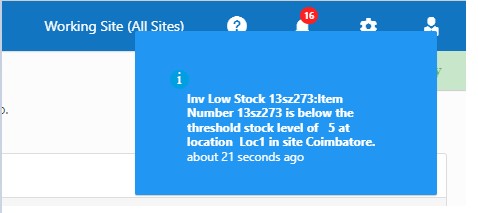
The Bell icon will also display the Low Stock notification.
- Email Notification
- Similarly, the notification icon will show "Reorder Item" and "View POs" options if the stock level is below the threshold stock level at a particular site/location.
- For example, consider that the "Is" field in the "As soon as event occurs" section is set to "Location below min stock level" for a specific item.
- Once the item stock level falls below the min stock level at the location, the popup notification will trigger, and clicking the bell icon will provide the options to "Reorder Item" and "View POs," taking you to the respective screens.
Edit a Notification
View or Edit a notification by clicking the checkbox next to it on the View Notifications screen, and then clicking on the notification name.
The Edit Notification screen will appear, allowing you to make changes as needed.
Delete a Notification
On the Notifications List, select the Notification(s) you want to delete, then click on the Delete button.
A confirmation screen will appear. Click on the Delete button again to delete the selected notification(s).